
There is something almost mystical about sourdough. It crackles when you cut it, smells tangy and warm, and tastes like slow time and care. But for many home bakers, sourdough feels intimidating — bubbling starters, folding schedules, strange words like “autolyse” and “fermentation.”
Here’s the truth: sourdough isn’t magic. It’s rhythm. Once you understand the steps, you can bake bakery-level bread in your own kitchen with patience, not perfection.
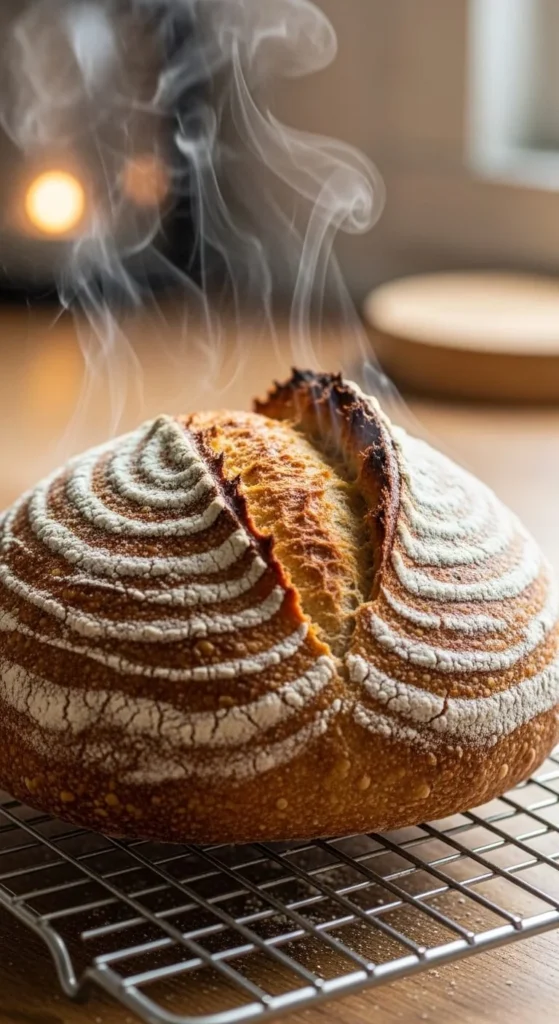
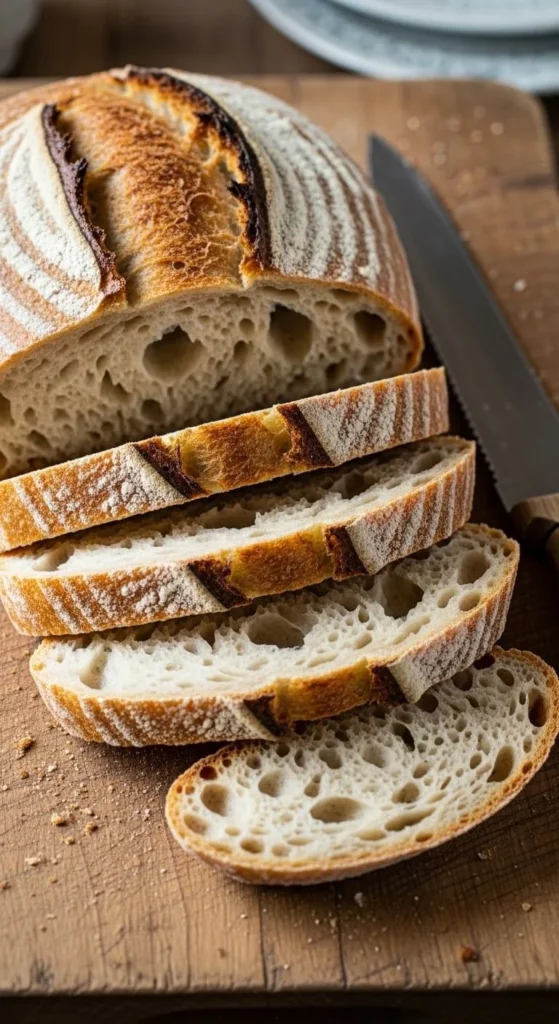
Imagine pulling a golden loaf from the oven — blistered crust, deep caramel color, and that hollow thump when you tap the bottom.
If you want that moment in your kitchen, this guide will walk you through it clearly, calmly, and confidently.
Build (or Care for) a Strong Starter
Great sourdough begins with a healthy starter.
Your starter should be:
- Bubbly
- Slightly sour-smelling
- Active enough to double in size within 4–6 hours after feeding
If you already have one, feed it the night before baking with equal parts flour and water.
If you’re new to sourdough, you can make a starter in about 7–10 days by mixing flour and water daily. But for today, assume you’re working with an active one — that’s your engine.
A weak starter = dense bread.
A strong starter = lofty, airy crumb.
Mix the Dough (The Gentle Way)
For one standard loaf, you’ll typically use:
- 100g active starter
- 350g warm water
- 500g bread flour
- 10g salt
Stir starter and water first until cloudy. Add flour and mix just until shaggy — no kneading yet. This rough mix is your foundation.
Cover and let it rest for 30–60 minutes. This rest is called autolyse, and it helps the flour hydrate naturally. Your dough will feel softer and easier to handle afterward.
Add Salt and Start Folding
Sprinkle salt over the dough, add a splash of water, and pinch it in with your fingers.
Now you’ll do stretch-and-folds instead of traditional kneading:
- Grab one edge of the dough.
- Stretch it up.
- Fold it over the center.
- Rotate the bowl and repeat 4–6 times.
Do this every 30 minutes for about 2 hours. The dough will go from loose and sticky to smooth, elastic, and alive.
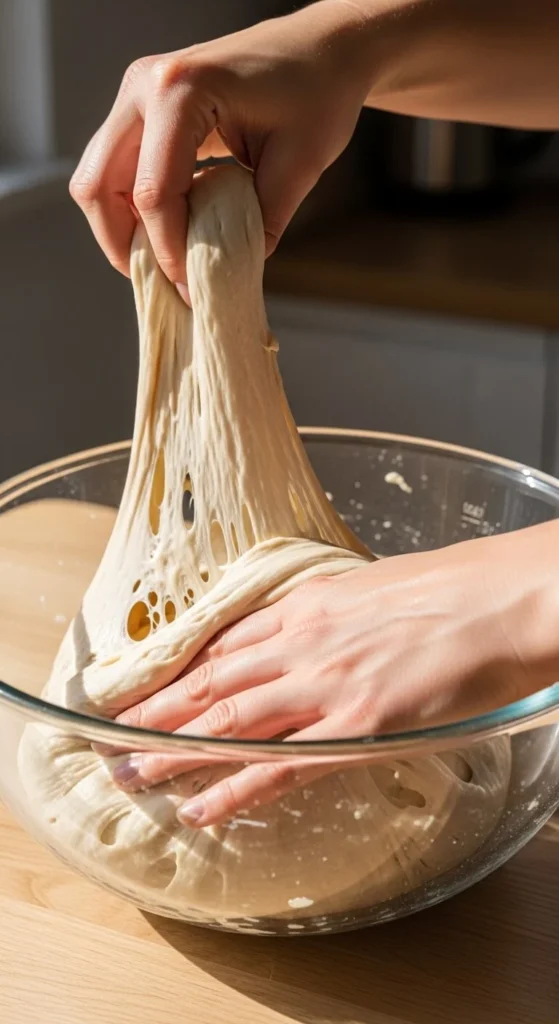
This is where structure is built — slowly, gently, like training a muscle.
Bulk Fermentation (Let the Dough Do Its Thing)
After folding, let the dough rest and rise at room temperature for 3–5 hours.
You’re looking for:
- About 50–70% increase in size
- Visible bubbles on the surface
- A light, airy feel when you jiggle the bowl
If your kitchen is warm, fermentation will be faster. If it’s cool, it will be slower. Trust your eyes more than the clock.
This is patience in action — and it’s what gives sourdough its flavor.
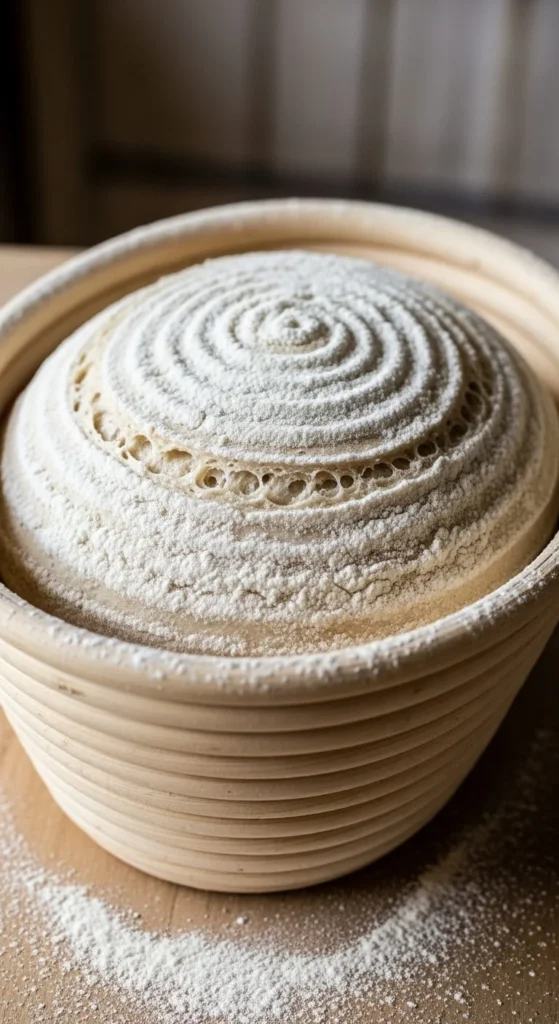
Shape With Confidence
Turn the dough onto a lightly floured counter. Gently pull it into a loose round. Let it rest 10 minutes.
Then shape more firmly:
- Cup your hands around the dough
- Pull it toward you across the counter
- Create surface tension on top
You want a smooth, tight dome — like a little bread planet.
Place the shaped dough seam-side up into a floured banneton or bowl lined with a cloth.
Cold Proof for Better Flavor
Cover the dough and place it in the fridge for 8–16 hours.
Why cold proof?
- Deepens flavor
- Strengthens structure
- Makes scoring easier
This is the secret step most “pro” bakers swear by. You’ll bake straight from cold the next day.
Preheat Like You Mean It
Set your oven to 475°F / 245°C and place a Dutch oven inside to heat for at least 45 minutes.
Hot pot = better oven spring (that dramatic rise in the first minutes of baking).
When everything is blazing hot, carefully remove the dough from the fridge and flip it onto parchment paper.
Score the Loaf
Use a sharp razor or bread lame to slash the top of your dough.
One bold cut is enough for beginners — about ½ inch deep. This gives steam a path to escape and helps the loaf expand beautifully.
No score = unpredictable cracks.
Clean score = gorgeous bloom.
Bake With Steam, Then Crisp the Crust
Transfer the dough (with parchment) into the hot Dutch oven. Cover with the lid and bake for 20 minutes.
This traps steam, helping the loaf rise tall and glossy.
Then remove the lid and bake another 20–25 minutes until deep golden brown. You want color — not pale bread.
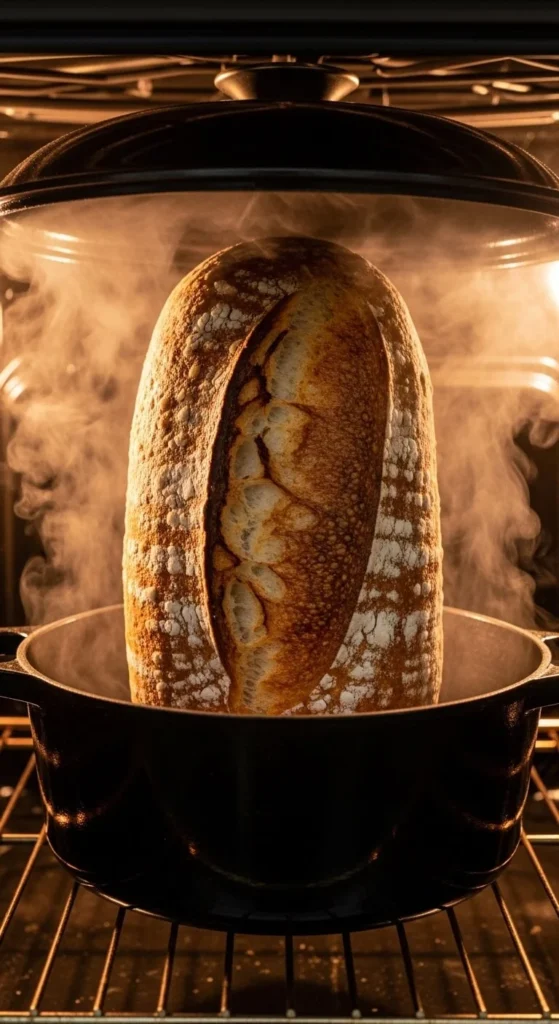
When done, the loaf should sound hollow when tapped on the bottom.
The Hardest Step: Let It Cool
This is torture — but essential.
Place your bread on a wire rack and wait at least 1 hour before slicing.
Cutting too early releases steam and makes the crumb gummy. Cooling finishes the bake from the inside out.
Use this time to admire your work. You earned it.
Common Mistakes (And How to Fix Them)
Bread is flat
Your starter may be weak or your dough under-fermented. Feed more often and watch for bubbles.
Crumb is dense
Try longer bulk fermentation or gentler handling during shaping.
Crust too pale
Bake longer with the lid off — color equals flavor.
Loaf stuck to basket
Flour your banneton more generously next time.
Flavor Variations to Try
Once you master plain sourdough, experiment:
- Garlic & herb — fold in minced garlic and rosemary
- Seeded loaf — add sesame, sunflower, and flax
- Whole wheat mix — replace 20–30% white flour with whole wheat
- Olive loaf — add chopped olives in the second fold
Same method. New personality.
Serve It Like a Pro
Slice thick. Toast lightly. Try:
- Butter and flaky salt
- Avocado and lemon
- Soup dunking
- Sandwiches that hold their own
Great sourdough turns every meal into something special.
Final Takeaway
Sourdough is less about perfection and more about presence. Feed your starter, watch your dough, and trust the process. With practice, your hands will “know” what right feels like.
Love this craft? Save this guide for your next bake — and enjoy the pride of pulling your own crackling loaf from the oven.

Hannah Collins is a passionate home cook and food storyteller who believes every recipe tells a little love story. At TastyWriter, she shares simple, delicious recipes made for real kitchens and busy days — from cozy comfort dishes to creative new favorites. When she’s not cooking, you’ll find her photographing food, testing family recipes, or sipping tea while dreaming up her next tasty idea.
Leave a Reply